Understanding a Civil 3D and Infrastructure Suite mixed license environment
Issue:
You have a mixture of Civil 3D network licenses and Infrastructure Suite Premium or Ultimate network licenses and you are wondering which license AutoCAD Civil 3D 2012 will pull first.
It does not matter if AutoCAD Civil 3D 2012 was installed as part of one of the Autodesk Infrastructure Design Suites or as a point product (not as part of the suite). When you have a mixed license environment, AutoCAD Civil 3D 2012 will always look to pull a Civil 3D license first. If no Civil 3D licenses are available, it will then look to pull an Infrastructure Design Suite Premium or Ultimate license.
The following diagram shows this sequencing:
In the event that you first pull a Civil 3D network license and later, while that license is still in use, you pull one of the Infrastructure Design Suite licenses by launching a different product in that suite, the Civil 3D license will be returned and you will only consume the one suite license. The same thing applies if you first pull a suite license and then launch AutoCAD Civil 3D 2012.
******************************
Note: To allow this expected behavior, you must first apply the Autodesk Infrastructure Design Suite Network License Hotfix to the machine running AutoCAD Civil 3D 2012
******************************
2012 Autodesk Infrastructure Design Suite Network License Hotfix
In a continued effort to improve, we are releasing this hotfix for network license environments where both AutoCAD Civil 3D and Autodesk Infrastructure Design Suite Premium or Ultimate license exist.
This hotfix addresses a possible issue with AutoCAD Civil 3D 2012 pulling the incorrect license at launch. This hotfix should be applied to all machines that have AutoCAD Civil 3D 2012 installed, regardless of whether it was installed as part of a suite or as a point products (not part of a suite).
From the options below, select the appropriate executable file for your operating system:
| C3D2012_Cascade_HF_Win32.exe (exe – 11212Kb) | |
| C3D2012_Cascade_HF_x64.exe (exe – 12623Kb) |
2012 and AutoCAD Verticals Performance Slowdown Hotfix (32/64 bit)
| autocad2012_performanceslowdown_hf_32bit.zip (zip – 932Kb) | |
| autocad2012_performanceslowdown_hf_64bit.zip (zip – 1005Kb) | |
| Readme (htm – 3Kb) |
This hotfix is suitable for all AutoCAD 2012 verticals and will fix the slowdown caused by the layer control update available in the ribbon.
2012 Revit Products – Repopulating types when reloading a family
Issue
You have purged types from a family in a project. When you reload the family the purged types do not repopulate.
Solution
The following method is an approach to reload the purged types:
- Open the family in question.
- Inside the Family Editor, go to Create > Types.
- In the Family Types dialog, under Family Types, click New.
- Create a new Family Type. This will be a temporary type, so you can name it anything.
- Click OK to exit the dialogs.
- Reload this family back into the project.
Now the purged types should be reloaded back into the project. To remove the temporary type, you can go to Manage > Purge Unused, or delete it from the Families section of the Project Browser.
Failure Creating Deployment for Autodesk Building Design Suite Ultimate 2012 on Windows 7 x64 or Vista x64 Editions
**********************************
IMPORTANT LINK: New Information
This link contains sample INI files at the bottom!
**********************************
Issue
You attempt to create a deployment of the Autodesk Building Design Suite Ultimate 2012 and it fails to create the deployment. One of the folllowing error messages are displayed during the deployment creation:
========UPDATE from Autodesk Technical Support ***(See below for the latest from Autodesk Technical Support)
Thank you for your patience while I further researched this issue. I was also able to reproduce the behavior that you described so I discussed this case with the development team. There is currently a known issue which is being investigated and as a result, I have attached the Change Request to this case.
As a workaround, the development team suggested copying the Suite install image from the media to a location on the hard drive or on a network share, then modifying the setup.ini in the original install image to contain fewer products.
==========
The copy functions cannot be used.
The system cannot open the device or file specified.
===========
Autodesk Technical Support: Instructions for editing the SETUP.INI file.
NOTES on procedure:
1) The primary issue isn’t that a single product is causing the failure, it is with the number of products included.
- The main strategy is to reduce the number of products included in each deployment.
- That being said, we will create multiple setup.ini files and use them to install the products.
2) The following isn’t guaranteed to work 100% of the time.
3) This is a known issue that Autodesk development is currently working.
4) The following came from Autodesk Development
5) The snapshots used in this post are a typical SETUP.INI file and will not represent the exact INI file you will be editing.
6) It may be wise to test deploy this first
Steps
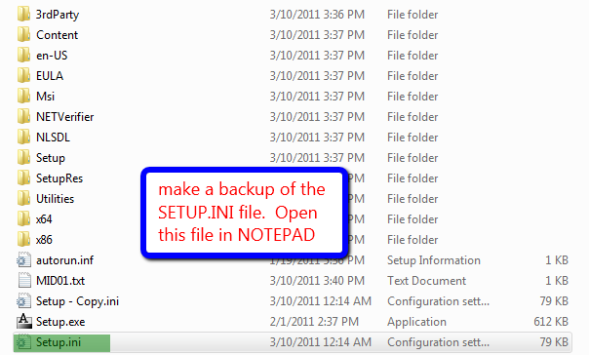
1) Copy the contents of the USB drive to the hard drive.
2) Make backup of the SETUP.INI file (make a copy of it)
3) Open the SETUP.INI in notepad
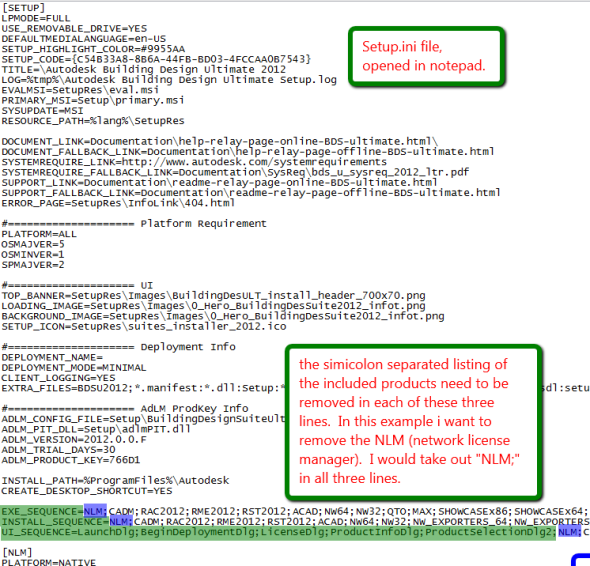
4) Search for the EXE_SEQUENCE=
- The next 2 lines underneath are the
- INSTALL_SEQUENCE=
- UI_SEQUENCE=
5) There will be a semicolon separated list of product abbreviations after the “=” sign.
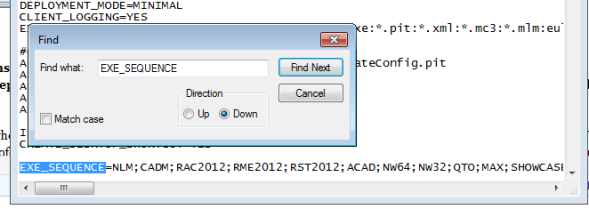
- To determine the product name from the abbreviation in the listing do a word search (from the edit pull down select find) -see figure.
- There should be a line starting with PRODUCT_NAME=product name (see figure)
6) Remove this abbreviation including the semicolon after it.
- Please note the end of each of these lines there is NO SEMICOLON (that is important)
7) When these items have been removed from all three lines then SAVE SETUP.INI and continue with the deployment.
- Please note that the exact number of products to be removed isn’t known at this time.
- I suggest cutting the list in half and creating 2 SETUP.INI files each containing one half of the products.

Notes From Brian Winterscheidt (many thanks for testing the above workaround with his notes)
As we discussed last week, care is needed in reducing the number of products, to be left with something that will still function.
Here are my notes so far on the various components listed in the ini file for BDS-U. The Deployment Notes/Requirements column outlines the relationships I have established, which affect the success or failure of deployment creation or functionality of the subsequent installation.
Components noted as “Required” either do not appear at all in the deployment configuration dialog for the indicated products (but are silently installed), or are presented as checked options, disabled from being unchecked. “Option” installs are presented as checkboxes or radio buttons in the deployment configuration options for the indicated products, selected by default, but can be deselected. The “Separate install” components do not appear to get include in actual deployments at all.
============================
Abbreviation
Full Application Name
Deployment Notes/Requirements
=============================
NLM;
Autodesk Network License Manager
Separate install from ‘Install Tools & Utilities’ button, server install for all Network licenses
CADM;
Autodesk CAD Manager Tools
Separate install from ‘Install Tools & Utilities’ button
RAC2012;
Autodesk Revit Architecture
RME2012;
Autodesk Revit MEP
RST2012;
Autodesk Revit Structure
ACAD;
Autodesk AutoCAD
NW64;
Autodesk Navisworks
NW32;
Autodesk Navisworks
QTO;
Autodesk Quantity Takeoff
MAX;
Autodesk 3DS Max Design
SHOWCASEx86;
Autodesk Showcase
SHOWCASEx64;
Autodesk Showcase
ACA;
Autodesk AutoCAD Architecture
MEP;
Autodesk AutoCAD MEP
ASD;
Autodesk AutoCAD Structural Detailing
ADR2012;
Autodesk Design Review
SKETCHBOOKDESIGNER2_0;
Autodesk Sketchbook Designer
INVENTOR;
Autodesk Inventor
DCLIBRARY;
Autodesk Inventor Content Center Libraries
Required for INVENTOR unless installing Vault Server (not included in BDS-U) separately.
InventorFusion;
Autodesk Inventor Fusion
ACFUSION;
Autodesk Inventor Fusion plugins for AutoCAD
Option for ACAD.
FUSION4INVADDINS;
Autodesk Inventor Fusion plugins for Inventor
Option for INVENTOR.
ASA2012;
Autodesk Sketchbook Designer for AutoCAD
Option for ACAD.
NW_EXPORTERS_64;
Autodesk Navisworks Exporter plugins
Option for RAC2012, RME2012, RST2012, ACAD, MAX, ACA, AMEP, ASD.
NW_EXPORTERS_32;
Autodesk Navisworks Exporter plugins
Option for RAC2012, RME2012, RST2012, ACAD, MAX, ACA, AMEP, ASD.
REVITSERVER;
Autodesk Revit Server
Separate install from ‘Install Tools & Utilities’ button, server install for RAC2012, RME2012, RST2012.
SDK;
Autodesk Revit Software Development Kit
Separate install from ‘Install Tools & Utilities’ button, for RAC2012, RME2012, RST2012.
CMILM2012;
Autodesk Common Materials Medium Image Library
Required for MAX, SHOWCASEx86, SHOWCASEx64. Option for RAC2012, RME2012, RST2012.
SNAP;
Autodesk Content Service
Separate install from ‘Install Tools & Utilities’ button.
SUBSTANCE;
Allegorithmic Substance Designer
Separate install from ‘Install Tools & Utilities’ button, for MAX.
SUBSTANCE_EXTRA;
Allegorithmic Substance extra content
Separate install from ‘Install Tools & Utilities’ button, for MAX.
SUBSTANCE_PLAYER;
Allegorithmic Substance Player
Separate install from ‘Install Tools & Utilities’ button, for MAX.
RPC_CONTENT;
Archvision RPC Content
Separate install from ‘Install Tools & Utilities’ button, for MAX.
RPC;
Archvision RPC Dashboard
Separate install from ‘Install Tools & Utilities’ button, for MAX.
CIVILVIEW;
Autodesk CivilView plugin
Separate install from ‘Install Tools & Utilities’ button, for MAX.
EASYNAT;
Bionatics EASYnat for 3DS Max Design
Separate install from ‘Install Tools & Utilities’ button, for MAX.
CRAFTANIMATIONS;
Craft Director Studio Promotional Edition
Separate install from ‘Install Tools & Utilities’ button, for MAX.
OKINO_POLY_NUGRAF;
Okino PolyTrans & Nugraf Demo
Separate install from ‘Install Tools & Utilities’ button, for MAX.
OKINO_PLUGINS;
Okino Plugins Demo Superinstaller
Separate install from ‘Install Tools & Utilities’ button, for MAX.
DWGTRUEVIEW2012;
DWG TrueView
Option for QTO.
COMPOSITE;
Composite
Option for MAX.
BACKBURNER;
Backburner
Required for MAX.
DCx86;
DirectConnect
Option for SHOWCASEx86.
DCx64;
DirectConnect
Option for SHOWCASEx64.
===========Second Workaround
These errors can occur when creating a deployment for the Autodesk Building Design Suite Ultimate 2012 from a machine running Windows 7 x64 editions (Enterprise, Ultimate, Professional, or Home Premium) or Windows Vista x64 editions (Enterprise, Ultimate, Business, or Home Premium).
To resolve this issue, create the deployment from a machine running Windows XP Professional x64 or Windows XP 32 bit editions (Professional or Home).


